Thursday 29 March 2018

An Asian salad with clementine and physalis


Hello everyone! As I mentioned in my last post, I spent the past two weeks busy in the kitchen - but not mine. I was helping my friend Luiz Hara, aka The London Foodie, with the photoshoot for his next book, The Japanese Larder. I had great fun and also learnt loads about Japanese food beyond sushi and sashimi. Luiz has developed really delicious and easy-to-make recipes.

One of those recipes, he kindly allowed me to share with you today, a sneaky preview, pre-book launching. Luiz is an expert in combining the flavours of East and West, as he has already shown in his previous book and regularly showcases in his supperclubs.

This salad is very simple to make and it is an explosion of flavours. It adds freshness and balance to any meal, especially when it accompanies meat. See below.


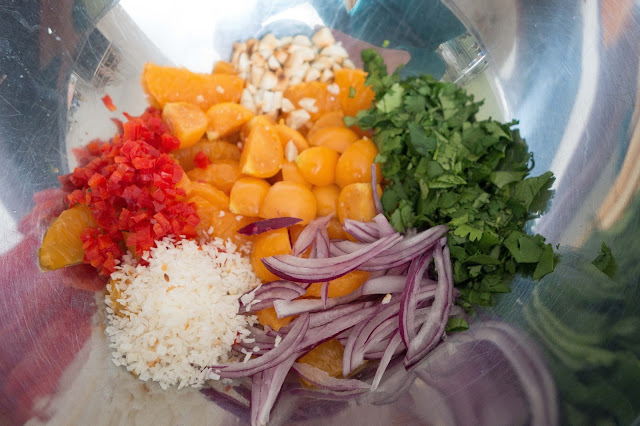
The ingredients...
...chopped and ready to be mixed.
My Asian salad with clementine and physalis.

Clementine, Coriander and Toasted Coconut Salad (The Japanese Larder - by Luiz Hara)  
Serves 2

In Luiz’s book this recipe accompanies the Roast Duck in Clementine Teriyaki Glaze. I have tweaked the recipe slightly, replacing two of the ingredients for the salad dressing just because I didn’t have the right ingredients at home. I need to upgrade my Japanese larder

For the salad 


2x clementines, peeled and segmented
4x physalis, washed and cut into quarters
2 Tablespoon coriander, chopped
¼ red onion, peeled and finely sliced
½ red chilli, finely diced
2 Tablespoon desiccated coconut
1 Tablespoon peanuts, toasted
micro coriander and edible flowers to decorate (optional)

For the salad dressing

1 Tablespoon light soy sauce (I used Tamari sauce)
1 Tablespoon lime juice
1 Tablespoon caster sugar (I used coconut sugar)
a generous pinch of dried red chilli flakes

Method

To make the salad dressing, add all ingredients in a bowl and mix well until the sugar is completely dissolved. Reserve.

Prepare the salad by peeling and segmenting the clementines. Remove as much of the white pith as possible. In a pan, dry-fry the desiccated coconut for a couple of minutes until lightly golden. In the same pan, dry-fry the peanuts for a few minutes until toasted, remove from the heat and roughly chop. Wash and cut each physalis into quarters.

Add the clementines, physalis, sliced red onion, chopped coriander, diced chilli, most of the desiccated coconut and toasted peanuts. Mix well.

To serve, mix the salad dressing into the clementine salad, transfer to the serving plates sprinkling the remaining toasted coconut and peanuts over it.

A healthy note: clementines (citrus x clementina) are rich in a variety of nutrients such as vitamin C and folate; minerals such as calcium, magnesium and potassium (good for the health of the heart); and a source of dietary fibre, which helps digestion, preventing constipation. Clementines contain the phytochemicals limonoids and quercetin.

Till next week!
Share:

Thursday 15 March 2018

A take-away breakfast


This week, and next, I won’t be cooking in my kitchen. I am helping a chef and friend, who is launching his second cookbook, with the photoshoot of his food. As I have been cooking with him and leaving very early in the morning, I take my breakfast with me to make sure that I have a good start. 

One of my choices of breakfast I’ve already posted here: a recipe for Bircher muesli. To be honest the way I make it always changes a bit depending on what I have at home. This week I have made the muesli with 75g of oats, 150ml of kefir, 60ml of apple juice (you can also use oat milk), half grated apple,
a squeeze of lemon juice, 25g walnuts, a pinch of cinnamon and ½ tbsp. of chia seeds, soaked overnight. As I mentioned on my previous post on Bircher muesli, soaking the grains and nuts overnight reduces the indigestible phytic acid and enzyme inhibitors. This process improves the digestion and absorption of the nutrients in this muesli loaded with fibre, protein, vitamins, minerals and essential fatty acids.

In the morning I just added mixed berries, black grapes and a few more chopped pecan nuts. To increase the vitamin C content, I also added ¼ teaspoon of vitamin C powder (Pure Radiance) - made from wild berries, berries and sprouts. If you want your muesli slightly sweeter you can drizzle some raw honey or maple syrup over it. Pour more kefir if needed. It serves 1-2.

I won’t be able to post next week but I will return the week after with some new recipe ideas.

See you in two weeks’ time! 
 
Share:

Thursday 8 March 2018

Celeriac - it looks odd but tastes great


I was planning to bake a courgette bread this week for a friend who came for lunch. But then I realised that it’s not courgette season. I like to make the most of the seasonal vegetables as they optimize the flavour. It is also better for the environment and local producers. I had a chance to go to my local farmer’s market this weekend and chose celeriac, the unusual bulbous-looking vegetable. A relative of celery, also called celery root, it has more of a nutty and creamy flavour.

I wanted to try to make something new with it, instead of soups, mash, or simply roasting. I decided to go for a simple celeriac version of potato galette (Pommes Anna). A no-fuss dish, with only a few ingredients. Just the way I like: simplicity is what I want to achieve more and more with my cooking.

I served it with some sautéed greens, farro salad and some slices of chicken. 


the unusual look of celeriac.
The roots.
The sliced celeriac.
Mixture of olive oil, butter, salt and pepper to pour over.
With tossed herbs.
Ready to bake for about 40-45 minutes.
My celeriac galette.

Celeriac galette style

Ingredients

1 large celeriac
1/4 cup extra virgin olive oil
50g organic unsalted butter
Maldon sea-salt
Freshly ground black pepper
1 Tablespoon fresh thyme, leaves picked
1 Tablespoon fresh oregano, roughly chopped
1/2 cup water


Method

 
Preheat the oven to 200°C. Slice the celeriac thinly - you can use a Japanese mandoline to make it easier. Place the slices in a mixing bowl and set aside.


Melt butter with the olive oil in a heavy bottom pan over medium heat, season with sea salt, black pepper and herbs. Pour the oil mixture over the sliced celeriac and toss. Place the celeriac in the oiled pan, overlapping the slices tightly and in layers. Add ½ cup of water. Bake until the celeriac is golden and tender, about 40-45 minutes.


Remove the pan from the oven and carry on cooking the galette on the stove to reach crispness. Cook it over high heat until you can see the edges and the bottom reaching a golden colour. It might take about 5-7 minutes (this timing may change depending on the size of your pan or the number of layers). Let it cool for about 10 minutes. 


Using a spatula, loosen carefully the edges of the galette. Turn it upside down onto a wooden board or a plate. If any celeriac slices stick to the pan just place it back on the top of the galette.  


 To finish the dish, sprinkle some fresh thyme and oregano over it.

A healthy note: Celeriac (Apium graveolens rapaceum) helps to maintain a healthy digestive system due to its high dietary fibre content. It’s a mild diuretic, and according to ayurvedic medicine it has warming properties. Celeriac is an excellent source of vitamins A, C, K, and the mineral potassium.

Till next week!
Share:

Thursday 1 March 2018

Warmth from my freezer


This week we were faced with Siberian weather in London. The city looks beautiful covered in snow but the reality is freezing, slippery walks.

Coming home from my daily chores, all I had in mind was a warm bowl of soup. Luckily my freezer held the most important ingredients for it. Frozen peas and frozen homemade chicken stock. I gathered a few more things from the pantry and … bang! My chunky pea soup was ready in less than 15 minutes.

It was satisfying and nourishing. The chicken broth is not only comforting but it is also very nutritious (check the healthy notes here, where I also explain how to make chicken stock). The peas combined with the basil leaves lend a sweetness to it.

The soup is creamy and delicious. Besides, it’s a pleasure to have this live green bowl in front of me, contrasting with the white scenery outside my kitchen window. 


The ingredients
After cooking the onions, add the leeks and cook for 5 more minutes.
Add the peas...
...and the chicken stock. Simmer for 5 minutes.
My chunky and creamy pea soup.
Chunky and creamy pea soup

Ingredients

3 Tablespoons extra-virgin olive oil
2 garlic cloves
1 small onion
2 leeks
500 g organic frozen peas (or fresh)
500 ml organic chicken or vegetarian stock
20 basil leaves
Sea salt and black pepper

Method

Heat the oil in a medium size pan, being careful not to let it burn. Add the onion and garlic, and cook, stirring often, until onions are soft. Add the leeks, season and cook until they have softened. Add the peas, stir, then add the stock and bring to a boil. Simmer for 5 minutes.

Transfer half of the soup to a blender, or food processor, add the basil leaves and whizz until it becomes creamy. Place it back into the pan and stir with the rest of the soup. Season to taste.

Serve with some basil leaves on top and sourdough toast.

A healthy note: Green peas (Pisum sativum) are a source of protein, carbohydrate and dietary fibre. They are a mild laxative. They strengthen the spleen, pancreas and stomach, and harmonize digestion. Peas contain B vitamins, vitamin C, magnesium, vitamin K, potassium, iron and carotenes.

Basil (Ocimum basilicum), also known as holy basil, or Tulsi in India, is well used by traditional healers. In India and Africa, people rub the basil leaves against their skin to repel insects. Basil is loaded with carminatives (gas dispelling phytochemicals) and, like the mint family, basil is traditionally used to settle an upset stomach. Sweet basil is better used as a tea for indigestion, colds, flu, fever, headaches, nausea, cramps, kidney and bladder problems. Its medicinal properties include anti-pyretic (anti-fever), stimulant, diuretic and nervine.

Till next week!
Share:
© Margot's Kitchen | All rights reserved.
Blog Layout Created by pipdig